
When installing a fiberglass pool, expect careful site preparation, including clearing debris and ensuring the ground is level. The shell is delivered in one piece or large sections, then lowered into an excavated, ready area. The process typically takes just a few days, followed by backfilling, plumbing, and finishing touches like decking or landscaping. Proper planning and site readiness make the installation smoother. To learn more about each step, keep exploring what to expect throughout the process.
Key Takeaways
- Site preparation involves clearing, leveling, and ensuring the ground is stable, which impacts costs and installation timelines.
- The fiberglass shell is delivered in large sections and installed within a few days, making the process quicker than other pool types.
- Proper permits and utility line management are essential to prevent delays and ensure a smooth installation process.
- Installation includes lowering the shell, backfilling, and connecting plumbing and filtration systems for functionality.
- Finishing touches like decking and landscaping are added after installation, aligning with your budget and design preferences.

Installing a fiberglass pool is a manageable process when you understand what to expect. One of the first things you’ll want to consider is the cost considerations involved. Fiberglass pools tend to have a higher upfront price compared to other pool types, but they often save you money in the long run due to lower maintenance costs and quicker installation times. The initial expense covers not only the pool shell itself but also the installation process, permits, and any additional features you might want. Keep in mind that costs can vary based on the size and shape of the pool, the complexity of the design, and your location. It’s a good idea to get detailed quotes from reputable contractors so you can budget effectively and avoid surprises down the line.
Site preparation is a vital step that can influence both the timeline and overall costs of your fiberglass pool installation. Before the pool can be delivered and installed, the site must be properly prepared. This involves clearing the area of any vegetation, debris, or obstructions, and ensuring the ground is level and stable. You may need to excavate or modify the landscape to create a suitable foundation—this is especially important to prevent shifting or settling that could damage the pool over time. Site preparation also includes obtaining any necessary permits, which vary by municipality, and ensuring that utility lines are identified and avoided. The better your site is prepared, the smoother the installation process will go, reducing the risk of delays and additional expenses. Additionally, understanding the importance of contrast ratio can help ensure your pool area is well-lit and visually appealing, especially when considering lighting options for evening use.
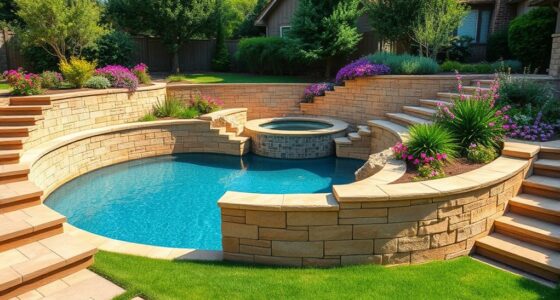
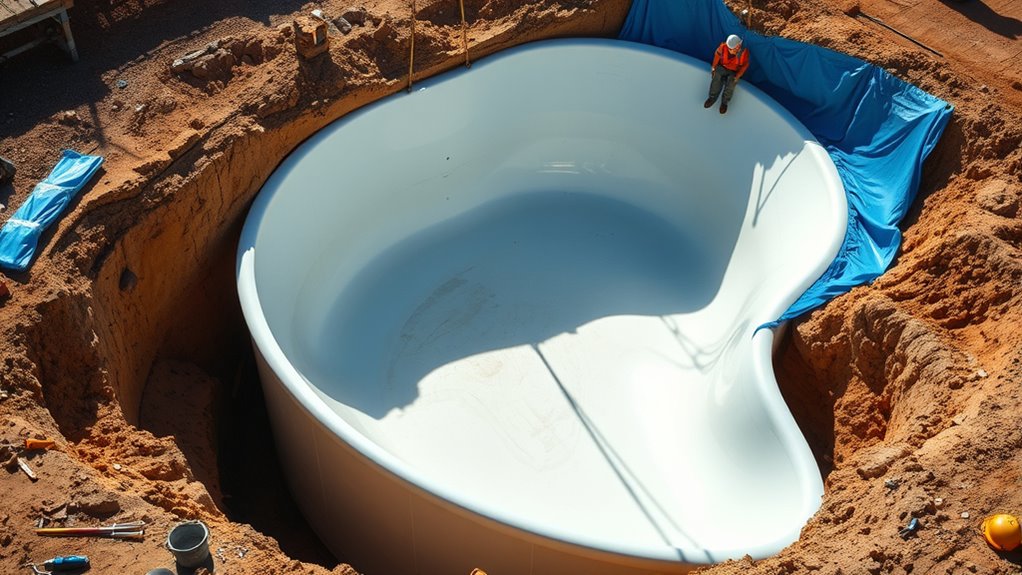
Once your site is ready, the installation itself involves bringing in the fiberglass shell, which is usually delivered in one piece or in large sections, depending on the size. The shell is carefully lowered into the excavated area and precisely positioned. This part of the process is relatively quick compared to other pool types, often taking just a few days. After placement, the contractor will backfill around the pool, ensure proper drainage, and connect the necessary plumbing and filtration systems. You should also prepare for the finishing touches, like decking or landscaping, which can be added afterward. Throughout the process, communication with your contractor is key—making sure they understand your expectations and that all work aligns with your budget and timeline. By being informed about cost considerations and site preparation, you’ll be well-equipped to navigate the installation with confidence.
Frequently Asked Questions
How Long Does a Fiberglass Pool Installation Typically Take?
A fiberglass pool installation usually takes about 1 to 2 weeks. First, you’ll see pool excavation, where the site is prepared. Then, the crew handles equipment setup and places the fiberglass shell. After that, they fill the pool and finish the surrounding area. Your timeline depends on site conditions and project complexity, but generally, you can expect a smooth process within this timeframe.
What Maintenance Is Required After Installation?
Like tending a garden, maintaining your fiberglass pool requires regular care. You’ll need to keep up with pool cleaning to prevent debris buildup and guarantee clarity. Chemical balancing is essential to keep the water safe and inviting, preventing algae and bacteria growth. Check the pH and sanitizer levels weekly, and shock the pool as needed. Consistent maintenance keeps your pool sparkling and extends its lifespan, making every swim a revitalizing experience.
Can I Customize the Shape or Size of My Fiberglass Pool?
Yes, you can customize your fiberglass pool’s shape and size, but options are more limited than with other types. You’ll find various pool color options to match your style, and many manufacturers offer warranty coverage for added peace of mind. Keep in mind, custom shapes may affect installation time and cost, so discuss your preferences with your pool professional to ensure your vision aligns with available options and warranty terms.
Are There Any Restrictions on Pool Location or Soil Type?
Imagine you’re planning your dream pool, but soil restrictions could pose a challenge. You should check for pool location restrictions, like proximity to underground utilities or property lines, before installation. Soil compatibility concerns are vital; for example, sandy soil may require additional reinforcement. Consulting with experts guarantees your chosen spot meets local regulations and soil requirements, helping you avoid costly issues and enjoy your fiberglass pool for years to come.
What Are the Costs Involved Beyond Installation Fees?
Beyond installation fees, you’ll need to budget for pool cover costs, which help keep your pool clean and safe, especially during off-season months. Landscaping expenses are also common, as you’ll want to enhance the area around your pool for aesthetics and privacy. These costs vary based on size and materials, so plan accordingly. Including these in your budget guarantees a smooth setup and long-term enjoyment of your fiberglass pool.
Conclusion
As you commence on this journey, remember that patience and preparation pave the way for a smooth experience. While the process may have its gentle twists and turns, each step leads you closer to a beautiful oasis tailored just for you. Embrace the anticipation, knowing that a little time and care will transform your backyard into a tranquil retreat. Soon enough, you’ll be enjoying the serenity of your fiberglass pool, a quiet reward for your trust and effort.