Use this guide to choose an automatic pool vacuum that matches your pool, connect and run it safely, and check that it cleans properly. It is written for pool owners who are new to robotic, suction-side, or pressure-side cleaners. Allow about 30-60 minutes to review compatibility and complete the first setup; the actual cleaning cycle may take longer.

Get pool and patio gear delivered free — and shop member deals
- Fast, free delivery on millions of items
- Access to Prime Big Deal Days deals on October 6–7
- Prime Video, Amazon Music and more included
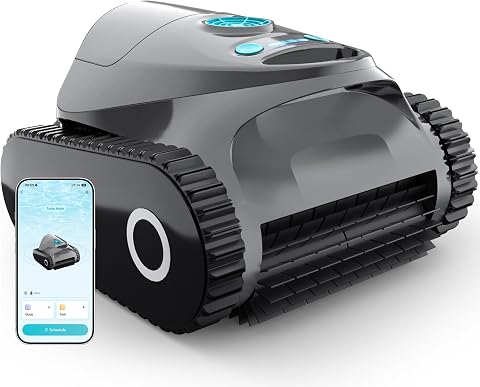
C1 Robotic Pool Cleaner, Deep Gray
- ✔ Cleaning modes: 7
- ✔ Battery life: 180 minutes
- ✔ Charging time: 2.5 hours
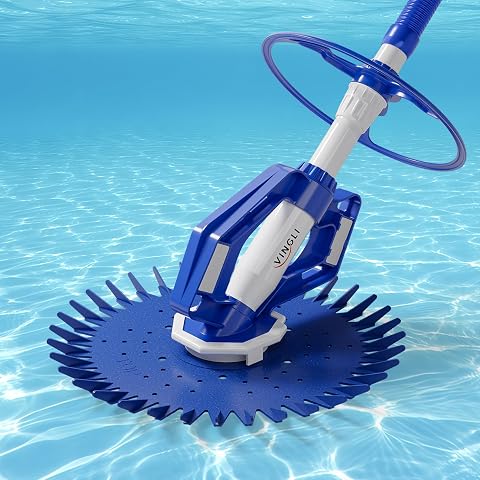
VINGLI Automatic Wall-Climbing Pool Vacuum
- ✔ Power source: Suction powered
- ✔ Pump requirement: At least 3/4 HP or 1,600 GPH
- ✔ Hose length: 33 ft

XtremepowerUS Automatic Pool Cleaner with 30ft Hose Set
- ✔ Cleaner type: Automatic suction-side
- ✔ Pool type: In-ground
- ✔ Minimum pump power: 1 HP
Difficulty: Beginner | Time: 30-60 minutes for selection and first setup; cleaning time varies by model and pool
What You’ll Need
Tools & Materials:
- Pool vacuum’s manual and model information
- Pool dimensions, shape, surface type, and approximate depth
- Access to the pool pump, filter, and skimmer or dedicated cleaner line
- A safe, grounded electrical outlet for a robotic cleaner, if applicable
- Pool test kit or recent water test results
- Garden hose and soft brush for rinsing and cleaning, as needed
Knowledge:
- Basic ability to identify pool equipment and switch the pump off
- Awareness of your pool surface, steps, drains, and fittings
- Ability to follow the cleaner maker’s electrical and installation instructions
Check the pool and cleaner manuals before buying or connecting equipment. Automatic cleaners are not interchangeable: robotic models use electricity and collect debris in onboard filters; suction-side models connect to a skimmer or suction line; pressure-side models use a return line and may need a booster pump. Check warranty terms and local electrical requirements. Never use an extension cord with a robotic cleaner unless its manual explicitly permits it.
C1 Robotic Pool Cleaner, Deep Gray
The C1 Robotic Pool Cleaner earns the top spot because it takes a different route from the two suction-side models: it runs cordless, has app control, and offers wall and waterline cleaning. Its seven modes give owners options for tailoring a cleaning run, while the stated 180-minute battery life and coverage of pools up to 1,615 square feet make it the most feature-rich choice in this group. That breadth is useful for buyers who want to avoid connecting a cleaner to the pool’s suction system.Compared with VINGLI and XtremepowerUS, the C1 does not ask us to match the cleaner to a minimum pump rating; instead, we need to manage charging and setup. It takes a stated 2.5 hours to charge, and the product information says it needs setup before entering the water. Its app and cordless design may reduce hose-related hassle, but they also add a separate device and battery routine. The listing provides no warranty information, so we should confirm coverage before buying rather than assume it matches the one-year limited warranty specified for VINGLI.This is our strongest all-around pick for in-ground pool owners who value flexible cleaning modes and waterline coverage. It is not the natural choice for above-ground pools, nor for buyers who prefer a cleaner that draws power through existing pool equipment instead of requiring a charged battery.
Pros:
- Cordless design avoids a cleaner hose connection to the pool system.
- Wall climbing and waterline cleaning offer broader stated coverage than floor-only cleaning.
- Seven cleaning modes and app control allow run customization.
- Stated 180-minute battery life and coverage up to 1,615 square feet.
Cons:
- Requires charging; the stated charge time is 2.5 hours.
- Only specified for in-ground pools and requires setup before use.
- No warranty information is provided in the supplied details.
Best for: In-ground pool owners who want cordless operation, app-selected modes, and stated wall-to-waterline cleaning.
Not ideal for: Above-ground pool owners, buyers seeking a pump-connected cleaner, or anyone unwilling to charge and set up a separate robotic unit.
Bottom line: We recommend the C1 for in-ground pool owners who prioritize cordless, customizable cleaning and accept its charging and warranty-information tradeoffs.
“We recommend the C1 for in-ground pool owners who prioritize cordless, customizable cleaning and accept its charging and warranty-information tradeoffs.”
VINGLI Automatic Wall-Climbing Pool Vacuum
For buyers who want a suction-side cleaner rather than a battery-powered robot, VINGLI is the more flexible of the two pump-connected options on paper. It includes 33 feet of scuff-resistant hose, three feet more than XtremepowerUS, and its listed pump threshold is 3/4 HP or 1,600 GPH rather than XtremepowerUS’s 1 HP minimum. That difference can help owners assess compatibility, though we still need to verify our actual pump and pool setup against the manufacturer’s requirements.VINGLI is described as cleaning in-ground pool floors and walls, with wheel deflectors intended to help it navigate corners. Its quiet-operation design and approximately three-minute assembly offer a straightforward alternative to the C1’s charging and app-based setup. Unlike the robot, however, VINGLI uses the existing filtration system, so we should expect its suitability to depend on pump performance and the correct installation. The stated pool limitation is also clear: it is for in-ground pools only.The tradeoff against XtremepowerUS is not that VINGLI eliminates pump demands; it still needs a sufficiently capable pump. Rather, VINGLI has the longer included hose and lower stated horsepower threshold, plus a one-year limited warranty in the supplied specifications. Buyers who want independent robotic operation or explicit waterline cleaning should instead consider the C1, whose feature set is broader but requires battery management.
Pros:
- Includes a 33-foot set of scuff-resistant hoses.
- Listed pump requirement is 3/4 HP or 1,600 GPH.
- Wall-climbing design and wheel deflectors support floor, wall, and corner cleaning.
- Quiet-operation design, quick assembly, and a one-year limited warranty are specified.
Cons:
- Requires a sufficiently powerful pool pump to operate properly.
- Limited to in-ground pools.
- Uses the pool filtration system rather than offering the C1’s cordless robotic operation.
Best for: In-ground pool owners who already have a compatible pump and want a suction-side cleaner with a 33-foot hose and wall-climbing capability.
Not ideal for: Above-ground pool owners, pools with pumps below the stated requirement, or buyers who want cordless operation and app controls.
Bottom line: We choose VINGLI over XtremepowerUS for suction-side buyers who value a longer hose and a lower stated horsepower threshold, provided their pump is compatible.
“We choose VINGLI over XtremepowerUS for suction-side buyers who value a longer hose and a lower stated horsepower threshold, provided their pump is compatible.”
XtremepowerUS Automatic Pool Cleaner with 30ft Hose Set
The XtremepowerUS Automatic Pool Cleaner is the other straightforward suction-side option here. It attaches to the existing filtration system, includes a 30-foot hose set, and is described as cleaning in-ground pool floors and walls. Its wheel deflectors are intended to help it pass corners and tight spaces, giving it a similar broad navigation purpose to VINGLI. For owners whose equipment already meets its requirements, it offers an automatic cleaner without moving to the C1’s separate robotic-and-battery setup.The most important comparison is its 1 HP minimum pump requirement. That is higher than VINGLI’s stated 3/4 HP threshold, so we would prioritize VINGLI when pump capacity is uncertain or the lower stated threshold better suits our system. XtremepowerUS lists a 1,600-gallon-per-hour minimum flow rate as well; buyers should check the actual equipment and installation rather than rely on horsepower alone. The 30-foot hose is also shorter than VINGLI’s 33-foot set, which can matter when hose reach is tight.XtremepowerUS is not a match for every pool layout: the supplied details specifically say it is not suitable for cleaning stairs. It also lacks the C1’s cordless operation, app control, and stated waterline cleaning. We would choose it when our pump clears the stated threshold and our cleaning priorities are floors, walls, and corner navigation—not stairs or independent robotic coverage.
Pros:
- Connects to the existing filtration system as a suction-side cleaner.
- Designed for floor and wall cleaning, with wheel deflectors for corners.
- Includes a 30-foot, ten-section hose set.
- Quiet operation and easy assembly are stated product benefits.
Cons:
- Requires at least a 1 HP pump or 1,600 GPH flow rate as specified.
- Not suitable for cleaning pool stairs.
- The included hose is shorter than VINGLI’s stated 33-foot hose.
Best for: In-ground pool owners with a pump that meets the stated 1 HP or 1,600 GPH requirement who want a hose-connected floor-and-wall cleaner.
Not ideal for: Owners with stairs they expect the cleaner to handle, pools with lower-output pumps, or buyers who want cordless and app-controlled cleaning.
Bottom line: We would pick XtremepowerUS when its higher pump requirement is already met and stair cleaning is not a priority, but VINGLI is the more forgiving suction-side comparison.
“We would pick XtremepowerUS when its higher pump requirement is already met and stair cleaning is not a priority, but VINGLI is the more forgiving suction-side comparison.”
As an Amazon Associate we earn from qualifying purchases.
Before You Start
Remove large branches, toys, and other objects from the water so they do not block the cleaner. Keep people out of the pool while a cleaner is operating unless the manufacturer explicitly allows otherwise. For any hose or plumbing connection, switch off the pool pump before changing fittings. Keep robotic cleaner plugs and power supplies dry, and do not handle electrical equipment with wet hands. Do not use a cleaner to remove chemicals, algae treatment residue, or debris beyond the model’s stated capacity.
Step-by-Step Instructions
Step 1: Match the cleaner to your pool
Compare each cleaner’s specifications with your pool’s surface, dimensions, shape, depth, and features. Check whether it cleans the floor only or also climbs walls and reaches the waterline. Confirm it is approved for your surface, such as vinyl, fiberglass, or plaster, and can handle your pool’s length and any steps, ledges, or tight corners. Match the connection type to your equipment: robotic cleaners need a suitable power supply, suction-side cleaners need a compatible suction connection, and pressure-side cleaners need a suitable return line and sometimes a booster pump.
Tip: If your pool has unusual shapes, steep walls, delicate finishes, or a dedicated cleaner line, ask the pool equipment supplier to verify compatibility before purchase.
Check: You have a model whose stated pool size, surface, cleaning coverage, and connection requirements fit your pool and equipment.
Step 2: Inspect the pool and equipment
Remove large debris from the pool by hand or with a leaf net. Inspect the cleaner’s cable, hose, wheels or tracks, filter basket, and connections for damage or blockage. For a robotic cleaner, examine the power supply and cable for cuts or exposed wires. For a suction- or pressure-side cleaner, check hose sections and fittings for cracks, loose joints, and obstructions. Do not use damaged electrical equipment or a split hose.
Tip: Check water chemistry and filtration if the pool is cloudy or has heavy algae. A cleaner collects physical debris; it does not replace chemical treatment or a functioning filter.
Check: The pool is free of large obstructions, and the cleaner and connection parts show no damage that could affect operation.
Step 3: Prepare the cleaner’s connection
Set up the cleaner according to the maker’s instructions. For a robotic model, place the power supply on stable, dry ground at the required distance from the pool and outlet. Route the cable so it cannot snag on furniture or create a trip hazard. For a suction-side or pressure-side model, switch off the pump, then connect the cleaner to the specified skimmer, suction port, return line, or booster-pump arrangement. Use only the fittings and hose sections specified for your model.
Tip: Do not guess which pool port to use. A wrong connection can reduce circulation, prevent cleaning, or damage equipment. If a port is unclear, check the pool and cleaner manuals before proceeding.
Check: The cleaner is connected at the correct point, the hose or cable is safely routed, and the pump remains off until the plumbing connection is complete.
Step 4: Prime and position the cleaner
Prime and position the cleaner using the maker’s setup instructions. For a suction-side cleaner, fill the hose with water and release trapped air before connecting it; an air-filled hose can disrupt pump suction. For a pressure-side cleaner, connect the hose and supplied fittings as directed, then verify that the cleaner’s bag or filter is seated. For a robotic cleaner, lower the unit gently into the water and let trapped air escape as described in the manual. Do not drop it or pull it into place by its cable.
Tip: Some robotic models require a particular starting position or cable arrangement. Use that procedure rather than winding or twisting the cable tightly.
Check: The cleaner sits correctly in the water, the suction hose is water-filled if required, and all bags, baskets, and fittings are secured.
Step 5: Start the cleaner and check its movement
Start the cleaner according to its type: switch on the pool pump for a hose-connected cleaner, or power on the robotic cleaner using its controls. Watch it for the first few minutes. Confirm that water is flowing normally, the cleaner moves rather than remaining in one place, and the hose or cable does not snag or pull tightly. Check that the pump basket is not losing prime and that the cleaner does not repeatedly catch on steps, drains, or fittings. Stop the system before correcting a hose or connection problem.
Tip: Some cleaners follow patterns that appear slow or irregular. Judge movement against the maker’s operating instructions rather than expecting it to cover every area immediately.
Check: The cleaner moves or cycles as described by its manufacturer, with steady pool circulation and no leaks, abnormal noises, or persistent tangles.
Step 6: Run an appropriate cleaning cycle
Select and run the cleaning cycle recommended for your pool’s condition and cleaner model. Follow the instructions for pump operation if you have a suction- or pressure-side model. Avoid repeatedly stopping and restarting the cleaner unless you need to clear a blockage or correct a safety issue. For a heavily dirty pool, remove large debris first and plan to empty the cleaner’s basket or bag during or after the cycle if the manual calls for it.
Tip: A cleaner may need more than one cycle after storms or a long period without cleaning. Do not extend operation beyond the manufacturer’s limits.
Check: The cleaner completes its programmed or recommended run without losing suction, stalling repeatedly, or becoming trapped.
Step 7: Remove the cleaner and inspect the result
Switch off the cleaner and, for hose-connected models, switch off the pool pump before disconnecting anything. Lift a robotic cleaner by its handle, not by its cable. Remove and inspect its filter basket or debris bag; for a hose-connected unit, check its collection bag if fitted. Inspect the floor, walls, and waterline areas the model is designed to clean. Note any missed zones, stuck points, or remaining debris, and remove large leftovers manually rather than forcing the cleaner to collect them.
Tip: If a robotic unit is heavy with water, follow the manual’s retrieval method and let it drain as directed before carrying it.
Check: The debris container holds the collected material, the intended pool areas are visibly cleaner, and you have identified any repeat missed spots or obstructions.
Step 8: Clean and store the cleaner
Rinse the filter, bag, cleaner body, and hose with fresh water as directed. Remove hair, leaves, and grit from the brushes, tracks, impeller, or other serviceable parts only as the manual permits. Let parts dry if the manufacturer recommends it. Store the cleaner out of direct sun and away from chemicals; keep a robotic unit’s cable loosely coiled without tight bends. Disconnect plumbing fittings and store hoses according to the model instructions.
Tip: Do not use solvents, pressure washers, or sharp tools unless the manufacturer approves them; these can damage seals, filters, or electrical components.
Check: The debris container is empty, accessible parts are clear, and the unit is stored in a dry, shaded place without a kinked hose or tightly wound cable.
Common Mistakes to Avoid
- Buying a cleaner based only on price or pool size. — Compare surface compatibility, cleaning coverage, pool shape, connection type, and required flow or booster equipment before choosing a model.
- Starting a suction-side cleaner with air trapped in its hose. — Prime the hose fully with water using the maker’s method before attaching it to the suction connection.
- Running a robotic cleaner with a damaged cable or wet power supply. — Inspect the cable and power equipment before each use, keep the power supply dry, and stop using the unit if you find damage.
- Leaving collected leaves or grit in the filter after a cycle. — Empty and rinse the filter basket or bag after use; a clogged collection area can reduce cleaning performance.
Troubleshooting
Problem: The cleaner does not move or has weak suction.
Solution:
Stop the cleaner and switch off the pump before checking a hose-connected model. Empty the pump and cleaner baskets, clear visible blockages, inspect hose joints for air leaks, and confirm that the hose is primed. For a robotic model, check its power connection and reset it as the manual directs. If the pump loses prime or the cleaner still stalls, stop and ask a pool technician to check the system.
Problem: The cleaner gets stuck on steps, drains, or fittings.
Solution:
Turn it off before moving it. Check that the model is suitable for the pool layout, the hose or cable has the recommended length, and its floats or other adjustment parts are positioned as specified. Remove obstructions where possible. Use only manufacturer-approved adjustments or accessories; repeated trapping may mean the cleaner is not suited to that pool.
Problem: The cleaner leaves debris behind or misses areas.
Solution:
Empty the filter or bag, inspect brushes and intakes for blockages, and verify the selected cycle and flow settings against the manual. Remove oversized leaves by hand and run another suitable cycle if needed. If the same zone is missed repeatedly, review the model’s coverage limits and check for obstacles or a setup issue.
Problem: A robotic cleaner stops during its cycle.
Solution:
Switch it off and unplug the power supply before inspecting the unit. Check for a full filter, trapped debris, a tangled cable, or a blocked intake. Let the unit cool if the manual recommends a cooling period, then restart using the stated procedure. Do not open sealed electrical components; contact the manufacturer or a qualified service provider if the fault continues.
What Success Looks Like
The cleaner is compatible with your pool and connected as its manual specifies. It completes a cycle without leaks, abnormal pump behavior, electrical damage, or persistent snagging. Its filter or bag contains collected debris, the pool areas within its stated coverage look cleaner, and the unit is rinsed and stored safely after use. A single cycle may not clear a pool with heavy debris, so judge performance after removing oversized material and running the recommended cycle.
Next Steps
Set a cleaning schedule based on how quickly your pool collects debris, then empty and rinse the collection system after each run. Check the cleaner’s brushes, tracks, hose, cable, and filters at the intervals in its manual, replacing worn parts with approved components. If performance drops despite a clear filter and correct setup, stop operation and contact the manufacturer or a pool technician rather than opening sealed parts. Repeat a cleaning cycle after storms or heavy debris, and continue normal pool water testing and filtration.
Frequently Asked Questions
Can an automatic pool vacuum replace the pool filter?
No. A cleaner collects debris within its own basket or bag, or sends debris through the pool’s circulation system depending on its type. Keep the pool filter and pump maintained, and continue testing and treating the water.
Can I swim while the cleaner is running?
Keep people out of the pool while the cleaner operates unless both the pool and cleaner manufacturers explicitly allow swimming during use. Follow the manual’s electrical and entanglement warnings, and never swim with a cleaner that has a cord or hose in the water unless its instructions permit it.
How often should I run an automatic pool vacuum?
Set the schedule according to how much debris enters your pool, the cleaner’s cycle limits, and your filtration needs. Pools near trees or exposed to frequent wind may need more cleaning than sheltered pools. Do not run a model longer or more often than its manual allows.
Should I run the pool pump while using every type of cleaner?
No. Suction-side and pressure-side cleaners generally rely on pool circulation, while robotic cleaners use their own motor and may have different pump requirements. Follow the instructions for your exact model and pool system.
Why does my cleaner keep missing the same area?
Check for an obstacle, a snagging hose or cable, a full filter, an unsuitable cleaning pattern, or a mismatch between the cleaner and pool shape. Make only adjustments approved by the manufacturer. If the cleaner repeatedly misses an area after setup checks, ask the seller or a pool technician whether a different model or accessory is needed.
Halloween Picks
halloween
As an affiliate, we earn on qualifying purchases.